

Markers
Point markers let you precisely indicate locations on a map. The AMAP SDK provides annotation functionality that supports custom icons and callout views, along with event callbacks for tap and drag interactions.
Map annotations in the SDK are represented by the MAAnnotation class. Different markers can be distinguished by customizing their icons and callout view styles and content.
Add a Default Pin Annotation
The iOS SDK provides the MAPinAnnotationView class for pin annotations. You can configure the pin color, drop animation, and drag behavior (long-press to change coordinates). Follow these steps to add a pin annotation to the map:
Step 1: Add annotation data
Modify ViewController.m and add the following code in the viewDidAppear: method to create an annotation data object.
MAPointAnnotation *pointAnnotation = [[MAPointAnnotation alloc] init];
pointAnnotation.coordinate = CLLocationCoordinate2DMake(39.989631, 116.481018);
pointAnnotation.title = @"方恒国际";
pointAnnotation.subtitle = @"阜通东大街6号";

[_mapView addAnnotation:pointAnnotation];
Step 2: Implement the delegate method to configure the annotation style
Implement the mapView:viewForAnnotation: callback from the <MAMapViewDelegate> protocol.
- (MAAnnotationView *)mapView:(MAMapView *)mapView viewForAnnotation:(id <MAAnnotation>)annotation
{
    if ([annotation isKindOfClass:[MAPointAnnotation class]])
    {
        static NSString *pointReuseIndentifier = @"pointReuseIndentifier";
        MAPinAnnotationView *annotationView = (MAPinAnnotationView *)[mapView dequeueReusableAnnotationViewWithIdentifier:pointReuseIndentifier];
        if (annotationView == nil)
        {
            annotationView = [[MAPinAnnotationView alloc] initWithAnnotation:annotation reuseIdentifier:pointReuseIndentifier];
        }
        annotationView.canShowCallout = YES;       // Enables the callout bubble. Default is NO.
        annotationView.animatesDrop = YES;         // Enables the drop animation. Default is NO.
        annotationView.draggable = YES;            // Enables dragging. Default is NO.
        annotationView.pinColor = MAPinAnnotationColorPurple;
        return annotationView;
    }
    return nil;
}
Run the app. The pin annotation appears on the map. Tap the pin to display the callout bubble.

Add a Custom Point Marker
The iOS SDK supports fully custom annotations (including custom annotation icons and custom callout bubbles) using MAAnnotationView.
Custom Annotation Icon
If the default pin style does not meet your needs, you can use a custom icon. Follow these steps:
1. Add annotation data (see Step 1 in the pin annotation section).
2. Import the image file into your project. For this example, use an image named restaurant.png.
3. In the mapView:viewForAnnotation: delegate callback, set the image property of MAAnnotationView.
- (MAAnnotationView *)mapView:(MAMapView *)mapView viewForAnnotation:(id<MAAnnotation>)annotation
{
    if ([annotation isKindOfClass:[MAPointAnnotation class]])
    {
        static NSString *reuseIndetifier = @"annotationReuseIndetifier";
        MAAnnotationView *annotationView = (MAAnnotationView *)[mapView dequeueReusableAnnotationViewWithIdentifier:reuseIndetifier];
        if (annotationView == nil)
        {
            annotationView = [[MAAnnotationView alloc] initWithAnnotation:annotation
                                                          reuseIdentifier:reuseIndetifier];
        }
        annotationView.image = [UIImage imageNamed:@"restaurant"];
        // Offset the center point so the bottom center of the icon aligns with the coordinate.
        annotationView.centerOffset = CGPointMake(0, -18);
        return annotationView;
    }
    return nil;
}
Run the app. The annotation now displays the restaurant icon.
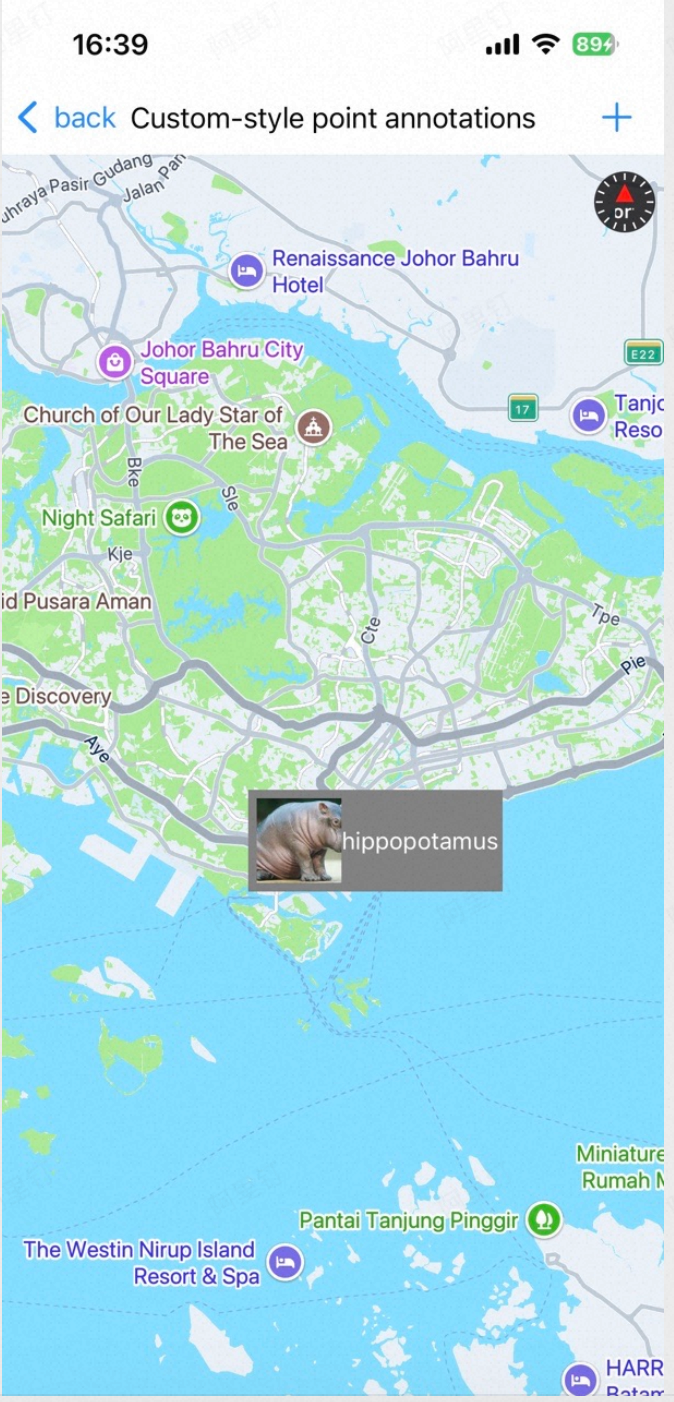
Custom Callout Bubble
A callout bubble (also known as a callout) consists of a background and content.
The content displayed in each callout is fully customizable. The following steps demonstrate how to create a custom callout bubble like the one in the image above. Note: Due to the highly custom nature of this content, only Objective-C examples are provided.
Step 1: Create the custom callout view class
Create a new class CustomCalloutView that inherits from UIView.
Step 2: Define data properties in the header file
In CustomCalloutView.h, define properties for the image, title, and subtitle.
@interface CustomCalloutView : UIView

@property (nonatomic, strong) UIImage *image;     // Merchant image
@property (nonatomic, copy) NSString *title;      // Merchant name
@property (nonatomic, copy) NSString *subtitle;   // Address

@end
Step 3: Override drawRect: to draw the callout background
In CustomCalloutView.m, override drawRect: to draw the callout background with a shadow and arrow.
#define kArrorHeight        10

- (void)drawRect:(CGRect)rect
{
    [self drawInContext:UIGraphicsGetCurrentContext()];
    self.layer.shadowColor = [[UIColor blackColor] CGColor];
    self.layer.shadowOpacity = 1.0;
    self.layer.shadowOffset = CGSizeMake(0.0f, 0.0f);
}

- (void)drawInContext:(CGContextRef)context
{
    CGContextSetLineWidth(context, 2.0);
    CGContextSetFillColorWithColor(context, [UIColor colorWithRed:0.3 green:0.3 blue:0.3 alpha:0.8].CGColor);
    [self getDrawPath:context];
    CGContextFillPath(context);
}

- (void)getDrawPath:(CGContextRef)context
{
    CGRect rrect = self.bounds;
    CGFloat radius = 6.0;
    CGFloat minx = CGRectGetMinX(rrect),
    midx = CGRectGetMidX(rrect),
    maxx = CGRectGetMaxX(rrect);
    CGFloat miny = CGRectGetMinY(rrect),
    maxy = CGRectGetMaxY(rrect) - kArrorHeight;

    CGContextMoveToPoint(context, midx + kArrorHeight, maxy);
    CGContextAddLineToPoint(context, midx, maxy + kArrorHeight);
    CGContextAddLineToPoint(context, midx - kArrorHeight, maxy);

    CGContextAddArcToPoint(context, minx, maxy, minx, miny, radius);
    CGContextAddArcToPoint(context, minx, minx, maxx, miny, radius);
    CGContextAddArcToPoint(context, maxx, miny, maxx, maxx, radius);
    CGContextAddArcToPoint(context, maxx, maxy, midx, maxy, radius);
    CGContextClosePath(context);
}
Step 4: Add content subviews
Add the UIImageView and UILabel subviews to display the image, title, and subtitle.
#define kPortraitMargin     5
#define kPortraitWidth      70
#define kPortraitHeight     50
#define kTitleWidth         120
#define kTitleHeight        20

@interface CustomCalloutView ()

@property (nonatomic, strong) UIImageView *portraitView;
@property (nonatomic, strong) UILabel *subtitleLabel;
@property (nonatomic, strong) UILabel *titleLabel;

@end

@implementation CustomCalloutView

- (id)initWithFrame:(CGRect)frame
{
    self = [super initWithFrame:frame];
    if (self) {
        self.backgroundColor = [UIColor clearColor];
        [self initSubViews];
    }
    return self;
}

- (void)initSubViews
{
    // Merchant image
    self.portraitView = [[UIImageView alloc] initWithFrame:CGRectMake(kPortraitMargin, kPortraitMargin, kPortraitWidth, kPortraitHeight)];
    self.portraitView.backgroundColor = [UIColor blackColor];
    [self addSubview:self.portraitView];

    // Merchant name
    self.titleLabel = [[UILabel alloc] initWithFrame:CGRectMake(kPortraitMargin * 2 + kPortraitWidth, kPortraitMargin, kTitleWidth, kTitleHeight)];
    self.titleLabel.font = [UIFont boldSystemFontOfSize:14];
    self.titleLabel.textColor = [UIColor whiteColor];
    self.titleLabel.text = @"titletitletitletitle";
    [self addSubview:self.titleLabel];

    // Address
    self.subtitleLabel = [[UILabel alloc] initWithFrame:CGRectMake(kPortraitMargin * 2 + kPortraitWidth, kPortraitMargin * 2 + kTitleHeight, kTitleWidth, kTitleHeight)];
    self.subtitleLabel.font = [UIFont systemFontOfSize:12];
    self.subtitleLabel.textColor = [UIColor lightGrayColor];
    self.subtitleLabel.text = @"subtitleLabelsubtitleLabelsubtitleLabel";
    [self addSubview:self.subtitleLabel];
}
Step 5: Set data on the subviews
Override the property setters in CustomCalloutView.m to pass data to the subviews.
- (void)setTitle:(NSString *)title
{
    self.titleLabel.text = title;
}

- (void)setSubtitle:(NSString *)subtitle
{
    self.subtitleLabel.text = subtitle;
}

- (void)setImage:(UIImage *)image
{
    self.portraitView.image = image;
}
Add a Custom Annotation View
To display the custom callout bubble when a marker is tapped, you need to create a custom annotation view. Note: Due to the highly custom nature of this content, only Objective-C examples are provided.
Step 1: Create the custom annotation view class
Create a new class CustomAnnotationView that inherits from MAAnnotationView or MAPinAnnotationView.
- If you inherit from MAAnnotationView, you must set the annotation icon manually.
- If you inherit from MAPinAnnotationView, the default pin icon is used.
Step 2: Define the custom callout property
In CustomAnnotationView.h, declare a property for the custom callout view.
@interface CustomAnnotationView : MAAnnotationView

@property (nonatomic, readonly) CustomCalloutView *calloutView;

@end
Step 3: Modify the callout view property in the implementation
In CustomAnnotationView.m, override the calloutView property to use your custom class.
@interface CustomAnnotationView ()

@property (nonatomic, strong, readwrite) CustomCalloutView *calloutView;

@end
Step 4: Override setSelected: to show or hide the callout
Override setSelected:animated: to add the callout view when the annotation is selected and remove it when deselected.
#define kCalloutWidth       200.0
#define kCalloutHeight      70.0

- (void)setSelected:(BOOL)selected animated:(BOOL)animated
{
    if (self.selected == selected)
    {
        return;
    }

    if (selected)
    {
        if (self.calloutView == nil)
        {
            self.calloutView = [[CustomCalloutView alloc] initWithFrame:CGRectMake(0, 0, kCalloutWidth, kCalloutHeight)];
            self.calloutView.center = CGPointMake(CGRectGetWidth(self.bounds) / 2.f + self.calloutOffset.x,
                                                  -CGRectGetHeight(self.calloutView.bounds) / 2.f + self.calloutOffset.y);
        }

        self.calloutView.image = [UIImage imageNamed:@"building"];
        self.calloutView.title = self.annotation.title;
        self.calloutView.subtitle = self.annotation.subtitle;

        [self addSubview:self.calloutView];
    }
    else
    {
        [self.calloutView removeFromSuperview];
    }

    [super setSelected:selected animated:animated];
}
Important: Make sure to add the building.png image to your project.
Step 5: Update the delegate method to use the custom annotation view
In ViewController.m, modify the mapView:viewForAnnotation: delegate method to return an instance of CustomAnnotationView.
#import "CustomAnnotationView.h"

- (MAAnnotationView *)mapView:(MAMapView *)mapView viewForAnnotation:(id<MAAnnotation>)annotation
{
    if ([annotation isKindOfClass:[MAPointAnnotation class]])
    {
        static NSString *reuseIndetifier = @"annotationReuseIndetifier";
        CustomAnnotationView *annotationView = (CustomAnnotationView *)[mapView dequeueReusableAnnotationViewWithIdentifier:reuseIndetifier];
        if (annotationView == nil)
        {
            annotationView = [[CustomAnnotationView alloc] initWithAnnotation:annotation reuseIdentifier:reuseIndetifier];
        }
        annotationView.image = [UIImage imageNamed:@"restaurant"];

        // Set to NO to use the custom callout view.
        annotationView.canShowCallout = NO;

        // Offset the center point so the bottom center of the icon aligns with the coordinate.
        annotationView.centerOffset = CGPointMake(0, -18);
        return annotationView;
    }
    return nil;
}
The program runs with the following effect:
